We are just so grateful and happy over the rain that soaked our cracked and dried out land all day yesterday. Ponds here have dried up and it has been a major struggle just to try and keep the little bit of garden we have left going.
I went out the day before we were to get all the rain and took a load of pictures and am heading out in a few minutes to take some now that we have had a good soaking. I imagine to see a great change starting to take place in our beds. While we do continue to water our beds when there is no rain one just could not imagine that rain water would make such a difference.
As our grandson so nicely pointed out to me, when God sends us water it is good for the garden because God has the best water. Boy oh boy for a 5 year old he is smarter than many adults I know.
So stop by and check it out I should have the pics up this weekend but I do have 2 cases of cucumbers that need to be made into pickles today and a garage sale to get ready for next weekend. Should have the pics up by Monday evening at the latest oh and surprise surprise I now have pictures of Loofah Gourds that have finally started to grow. I fear it is to late in the season for them to mature before the first frost but will keep our fingers crossed and see. Irregardless if that happens or not I have the pictures so if you try to grow your own you will be able to identify when they start to grow.
Saturday, September 1, 2012
Saturday, August 11, 2012
Hibiscus Plant and RaisedGarden Pictures
As I had told you all before my daughter and I really kept a close eye on the plants as they went on clearance at three local stores. Those were Wal Mart, Lowes and Ace Hardware. We found the best deals at Lowes and Ace Hardware.
One of those deals was a Hibiscus, I watched them closely as my mother was wanting one. Imagine my surprise when they went on sale from near twenty dollars to something like nine dollars. Mother had been looking for a peach colored one and I found it. So as a surprise to her we got it for her and were quite pleased with the savings we got as well. Turns out it was a light pink in color not peach, but she just loves it.
Several days after we got hers we went back looking for something else and they were down to three dollars each. Well, even though I had no idea what it really was I wasn't going to pass up that deal. I'm happier about that than you could ever imagine.
I have worked and worked with mine and finally got it to a point where all leaves were green and it is now used to being watered every Saturday.
I got up the other morning to he most beautiful surprise and I just had to share it with you.


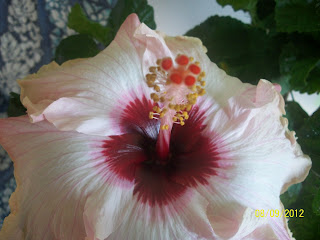
Isn't that the most beautiful bloom you have ever seen? Mom said her's has never opened up that flat before, her petals stayed more upright than these did. I was so awe struck at how large and beautiful the bloom was I hadn't taken notice of the fact that it didn't look like other blooms or....maybe that is what drew me to it so much.

I was afraid that in a picture people would not realize how large this bloom was which is why I placed my hand next to it. In fact the bloom is so large that it is bigger than a saucer plate you would get with a set of dishes.

The red center of this bloom amazes me as well. I told my husband that it looked like plastic. I carefully felt it, the petals are so very soft and the red part not only look like plastic but it looks like it as well.


The smaller of the two Loofah plants has started putting out blooms. I didn't get a picture of it but there were three blooms yesterday. I was thrilled to see them in all their splendor, these are the female blooms and sadly enough not the male blooms. I haven't seen any male blooms either and if that continues to be factual then there will be no Loofah sponges, seeds or anything for next year.

Several months ago I allowed several of the asparagus plants to get very tall and produce seeds. The normal course of action would be that they would dry on the limbs and drop to the dirt. In the past several years that we have had the patch I have seen no new ones drop so this year I picked them by hand there were hundred upon hundred of them. I let them dry in the house, removed the seeds and assured they were dry and put them back in the raised bed myself. We added some perilite to the compost mixture, sprinkled the seeds out and then put a layer of top soil on it. The taller plant you see in the background is the one coming from seed. The smaller one is an asparagus and it will be ready to pick and eat probably today.

This is our once beautiful strawberry patch. The heat has done a real number on it. I'm hoping that it will come out of it again before winter gets here.

This is another bed of vined green bean plants. I much prefer the bush but will take what I can for now. Some years are much better than others and this one has been tough.

Look at my beautiful Rose! I know its a bit blurry, I had a bad case of shaky hands today. But all the same this is the second bush that has bloomed. All these plants were one dollar each in Wal Mart, I just can't get over how good they all are doing.

I saw this flower bed at the Mo State Fair. Next summer I'm going to have tat going arond my house
Sunday, August 5, 2012
Canned Food Pictures

Yesterday was such a busy day. Hubby and I had an errand we had to run and that took us til around noon. Then I came home and picked up my mom and we went out looking at garage sales, it was a great deal of fun. I enjoy spending that one on one time with her. Then when we got home the busy work began. When we stopped working at 11:30 at night we had 7 quarts of potatoes, 11 1/2 pints of Strawberry Jelly and Jam and 10 pints of Peach Jam. It was a lot of work and it really did a number on me but it is so worth it to have this great food put up for the following year. Had it not been for my husband and daughter no where near this amount of food would have gotten done. They are always awesome to help me out.

This is the Strawberry Jam, I was hoping you would be able to see clearly how beautiful it is but the camera did not do it justice.

This one again was where I was trying to show you how you can "see" the texture of the jam in the jar.

This is th Strawberry Jelly, it had no pulp added to it so this is just a beautiful easy to spread jelly.

This is showing the 7 quarts of potatoes we got done. That is a quick and easy process to do. It was the first time I have done it and I was thrilled with how easy it is.

The jars in the front on the right side of the picture are the Peach Jam, oh I can't wait to get into that. Not only is it great on toast but fruit is a natural meat tenderizer so putting this or many of the other jellys and jams I've told you about on meat is an amazing experience in cooking, one you are not likely to forget any time soon. So give it a try I think you will love it as much as we do.

Close up of the Peach Jam

Canned Potatoes.
Loofah Plant Pictures

While this still isn't quite a current picture of my Loofah plants it is the next in the series of photos I've been showing you as this plant grows. Despite the horrid heat and drought conditions we have this summer the plant is growing quite well. The one issue I have is that so far there are been no signs of the actual loofah's. I'm hopeful that it will still happen and at the least am hoping for 1. If I get at least one Loofah then I'll have more than enough seeds to start a lot of plants next year.

This is my second set of Loofah plants. The one above and this one were planted (seeds) at the exact same time. This one has seemed to struggle to just get going but as you will see when I get follow up pictures loaded, it is ahead of the large plant by leaps and bounds. I dont know how many times I considered just pulling these up as they weren't "growing" like the others. So happy I didn't do that.

This is the same plant as the one prior. You can see how it is growing up the arch on the one side, doing a little in the middle and on the end where you can't see there s one plant there that is about an inch tall.

When you compare the small plant above to this one, whih is a section of the larger plant you can see what I mean about the size difference. I'm getting ready to head out this morning to check and see if we got rain and how all the garden plants are doing. So check back with me soon as I think I will have some suprises to show you.
Saturday, August 4, 2012
Orange Jelly
Okay friends, here we go this is the AMAZING Orange Jelly recipe I've been hinting at.
Please keep in mind that these jellies are not just for putting on your toast or bagel in the morning. Fruit is a natural meat tenderizer and using these on pork or chicken can just have some amazing results. Give it a try and come back and comment and let me know how it turned out for all of you.
Here we go! I so hope you all enjoy this jelly as much as I do. It brings the orange flavor out in a strong way, like when you bite into an orange and you get that little tick in your jaw! This jelly will do that for you also. I have a hard time not eating it with a spoon and forgetting about the bread.
Orange Jelly
5 cups of freshly squeezed orange juice.
let me state here that you can purchase orange juice with no sugar added and use that but you
will also be putting all the preservatives etc. that they put in orange juice into your jelly. I
not to do that as that is a huge part of what I'm trying to get away from for my family.
5 cups of Sugar
1 package of powder pectin.
Prepare your jars for canning, have them sterilized and ready to go. Due to the fact that you only process this jelly in a boiling cold bath canner for 5 minutes the jars MUST BE STERILIZED.
Have your lids and rings set out and ready to go, don't forget to put your lids in hot water before placing them on your jars so that they will seal.
In a large pot, do not use an aluminum pot, combine the sugar and orange juice and bring them to a boil. Make sure this is a roiling boil, that is a boil that cannot be stirred down.
Continue the boil until the ingredients are greatly reduced. I found that by the time I reached the required temperature it had reduced enough at that point.
You want the jelly to reach a boiling temperature of 220 degrees. Now to be honest mine never did get to 220, it hit about 217 and just stayed there. I let it boil for about two to three minutes at that temp and it worked out just fine.
Add the pectin and allow to boil for an additional 5 minutes. Again I didn't reach 220 at this stage either but did this step at 217 degrees and it caused me no problems.
Pour jelly into prepared jars. Wipe rims apply lids and rings. Then you will process this in a boiling cold bath canner for 5 minutes.
Makes 4-5 pints.
It is very important that you do not start timing the canning process until the water has returned to boiling.
As always this is the recipe I use for my family. Your choice to use this recipe is at your own discretion, I can not be held liable for any negative results you may have in the process of making the jelly or canning it.
Wednesday, August 1, 2012
General Jelly Recipe
Generic Jelly Recipe. There are some jelly's that will make their own pectin and there is no need to add pectin. I will get those listed shortly. But for general jelly like grape or strawberry this will work and turns out just wonderful.
1/2 tsp Butter (not margarine since it's nearly plastic, look it up)
4 C Fruit Juice
1/4 C Lemon Juice
1 Pkg Powder Pectin
4 1//2 C Sugar
Place fruit juice and lemon in a pot on the stove.
(I use my cast iron enamel coated pot as I don't have to worry about hot spots in it. If you would like one of those beautiful pots they come in blue and red. You can go to Wal mart and give them $60 for one or watch Aldi's and get them for $20.)
Sprinkle the pectin over the top of the liquid, no heat or stirring needed at this point.
Let the pectin sit for 1 minute and then stir it in.
Turn your heat on and get the liquids to a rolling boil. (a boil that cannot be stirred down)
Once you have reached a rolling boil stir in all sugar at once. Stir constantly to get the sugar dissolved and returned to a rolling boil.
The last rolling boil needs to be sustained for several minutes, I use a candy thermometer and when I get in the range of 217 to 220 degrees I keep it there for 1 minute.
Once jelly's are finished ladle out into canning jars if you are going to process them. I process them for 15 minutes in a cold bath canner. The water in the canner must be boiling as you start your time when the water is boiling not when you put the jars in.
If you are not going to can it then put it in a container and let cool then put it in the refrigerator.
This is one of the recipes I use in my home for my family. While we have never had any problems with it I cannot be held liable for your decision to use this and for any possible problems you may have with it or your canning process.
Sunday, July 22, 2012
Orange Jelly and Corn Relish
It's to late tonight and I'm exhausted but tomorrow I will be sharing the new recipes I tried today. Orange Jelly and Corn Relish.
The Orange Jelly is so amazing.....I just can't explain it, really you are going to have to try this recipe out. As a matter of fact I have the same thing to say about Corn Relish.
See you tomorrow and I oh so hope you enjoy these as much as we are!
The Orange Jelly is so amazing.....I just can't explain it, really you are going to have to try this recipe out. As a matter of fact I have the same thing to say about Corn Relish.
See you tomorrow and I oh so hope you enjoy these as much as we are!
Subscribe to:
Posts (Atom)